How to Insert UET Fields into SyteLine forms and to View the Component properties
How to Insert UET Fields into SyteLine forms and to View the Component properties
___________________________________________________________________________


Current Status: The above two UET fields (Preferred Vendor and Name) are created.
Requirement: Need to insert these two fields in Items Form in Planning Tab.
If the vendor number is selected, the name has to be displayed and has to be read only type.
Steps Involved (Summary):
In the Design Mode of the “Items” form,
Insert three objects into the “Items” Form – Planning Tab : Combo box for Vendor Number, Static button for the Vendor Label and Edit box for the Name to be displayed in read only mode.
Vendor label (Static button) does not need any additional fields to be entered other than the Description and Caption (details given below)
Vendor number (Combo box) needs to have a Binding field as well as Component Class and Parameters field as critical fields.
Component class has to be created if existing one cannot be used.
Validator is included as one of the fields in the Component Class and has to be created if the existing one cannot be used.
Component class is ready to use once the validator and other required fields are entered.
Note that the Parameters value should be the property name of the Vendor Name object (Edit box).
After all the changes, come out of Design mode and do the testing of ‘Items’ form.
Steps In Detail with screen shots:
Combo box ->
Name: UfVendNumEdit
Caption: C(UfVendNumStatic) [UfVendStatic -> is the name of the static label]
Type: ComboBox
Binding: object.itmUf_PrefVend
Component Class: PrefVendComp
Parameters: itmUf_PrefVName (this should be the property name of the Name Edit box)
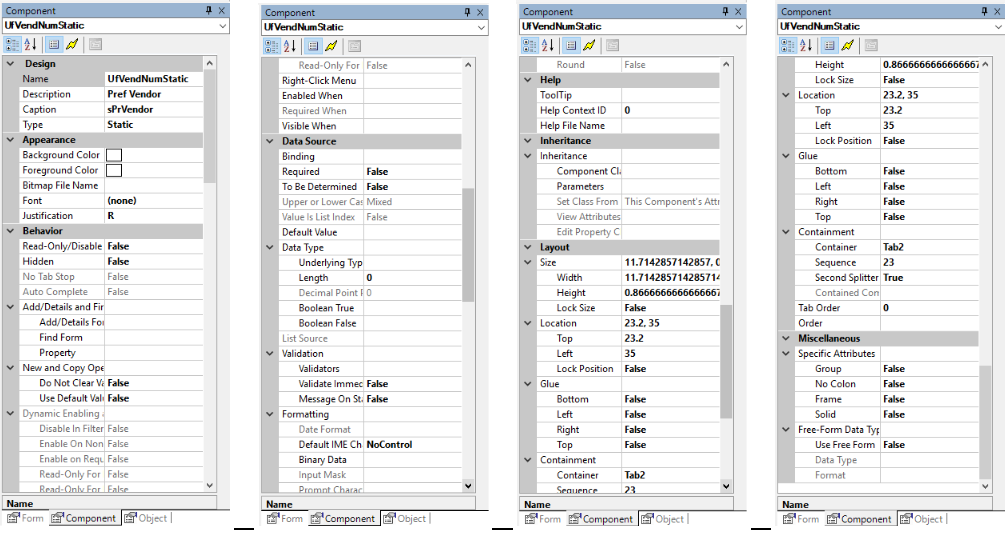
Static button ->
Name: UfVendStatic
Description: Pref Vendor
Caption: sPrVendor
Type: Static
Edit Box ->
Name: UfNameEdit
Type: Edit
Read-only/Disable: True
Binding: object.itmUf_PrefVName
How to Create a Component Class:
Right Click on the form and choose “Component Class”.
A window with the existing component classes pops up.

Either click ‘New’ to create one or select one of the related component class and click ‘Copy’ followed by modifying the newly copied component class.

List Source: STDOLE SLVendors( PROPERTIES(VendNum, Name) DISPLAY(1,2))
Validators: PVendName(%1)
Validate Immediately: True
How to Edit List Source Specification :
Click on the three dots (…) next to the List Source field.

Edit List Source Specification window opens up.

Create a Validator:
Right Click on the form and choose “Validators”.
A window with the existing validators pops up.

Either click ‘New’ to create one or select one of the related validator and click ‘Copy’ followed by modifying the newly copied validator.

Click on the three dots (…) next to the Parameters field.


Click on Set Prop/Var/Comp button.

Click on Properties button.

Click New button and the “Edit Set Property Value Pair” window pops up.
Target is given as ‘%1’ and Value as ‘Name’.
Select Ok all the way back to the “In Collection Validator Parms”
Window.
Now select Property = ‘VendNum’ and press Ok.
Go back to the Component Class now to include this Validator.
Validators :PVendName(%1)
Validate Immediately: True

After all these changes, the property windows are seen as below:
UfVendNumEdit

UfVendNumStatic
UfNameEdit
